In a previous job I worked as an industrial electrician for battery manufacturing company and in that capacity I did a lot of machine controls trouble shooting, machine control design and wiring. The company followed strict industry safety standards for machine wiring. The machine operators were required to test guard switches, START/STOP and ESTOP switches at the beginning of every shift. This was our culture and we had very few accidents.
Many of the machines belonging to members of this forum do not have wiring that would meet typical industrial machine safety standards. Is this bad? Hard to say, each of us has a unique situation. In my case I am a sole proprietor, a trained laser safety officer, licensed electrician and the only one that uses the machine. I fully understand all of the hazards associated with my machine and operate it accordingly. Should I follow the advice I’m about to give you, absolutely! I figured that if I am going to make a stab at making my machine safer then I should share that information with the group. Some of you may have hired help or family members using the machine. In the event of an accident, how would you feel, in the case of an employee how will your insurance company react? I don’t think I need to explain the ramifications of any of this. I see a lot of haphazard YouTube videos that make me cringe.
When I ordered my machine (50W China Blue) I had already watched a number of Russ’s videos and because of that I purchased this over the K-40 which was my original plan. I had a pretty good idea of what I was getting and what I would need to do to make it safer to use. The day my machine was delivered I uncrated it and looked it over for damage. Next I got my ohm meter out and checked to see if the grounding was done correctly and to ensure all of the connections were tight. Overall wiring and grounding it looked pretty good with the exception that the paint needed to be removed where the ground wires attached to the metal cabinet and door. Yes the door, any door that has electrical devices installed in it and in this case a fan was attached to it. These should be bonded (grounded) to the rest of the machine because hinges do not make good grounds. With that said there were the expected issues with lack of safety wiring and this is what I want to address here.
The rules and standards for machine safety wiring are extensive, how it is accomplished, and very expensive. Anything I share here will not conform to such standards because the cost will be prohibitive for most of us. Many of us are hobbyists, one man/woman shops so this is a boiled down version to get something better than what we have for a price we can afford. If you chose to use this information do so at your own risk.
Many of our machines (I do not wish to single out any particular country of origin) as wired don't come close to meeting industrial machine safety standards. Below is a list in no particular order of electrical issues I noted on my machine. This may vary from machine to machine and they may have other issues not noted here.
1] ESTOP switch is wired in series with all things electrical on the machine. This switch is not designed to break the load of the machine in operation and the supplementary loads such as the air compressor or water pump.
2] No grounded receptacles for the water pump or air compressor. (120 volt USA Model)
3] No guard safety switch on the main lid.
4] AC wiring color code not correct for the USA market.
5] Air pump not grounded but did have a lug to attach a ground wire. The case of the machine had a grounding terminal where this could be attached. I attached a separate wire for this.
6] Paint not removed from the metal parts that have grounding/bonding conductors attached.
7] DC wiring color codes not typical for industrial machine wiring.
8] No wire numbers on conductors or electrical schematic.
9] The connections on the laser tube were not well done. I had arcing at the high voltage end between the tube and the cabinet which may have caused a gas leak at the terminal post and the early demise of my laser tube.
10] The machine is not listed nor did I expect it to be. That is to say this machine has not been evaluated by a nationally recognized testing laboratory for safety. This is a requirement in the USA and such labs could be UL, CSA, ETL, TÜV to name a few. Equipment that has been listed has undergone safety testing to ensure the end user is protected from hazards associated with the machine during operation. This requirement may be different in other countries.
These are some of the good things about the wiring on my machine.
1] Wires terminating in terminal strips all had crimped insulated wire ferules installed on the ends. Hot glue was applied to them where the wires terminated to prevent them from coming loose in shipping.
2] There were no wires just twisted together and wrapped with tape aka: “flying splices”.
3] The wiring was neat and easy to follow.
4] Soldered and slide on connections (mains voltage) had heat shrink tube installed at terminations.
Here are few questions to ask: What are the hazards we need to address? What kind of event(s) do you consider an emergency? Will pressing the stop button on the keypad solve the problem? Below is a short list of possible hazards.
1] A fire inside the machine
2] Material moved out of position
3] Laser head crashed into something
4] Job is not running as expected
5] Guard door opened
6] Add something else to this list
I have a plan for how I want my machine to work which I will share but at this point I’m going to stop here and see what kind of discussion we get on this topic. I certainly welcome any questions, comments, and suggestions.
SAFETY WIRING for the LASER MACHINE, a GENERAL GUIDE Part 1 of TBD
-
Frank Small
- Posts: 73
- Joined: Sun Mar 24, 2019
- Location: Bennington, Vermont
- Country: USA
- Laser Machine Make or Type: 50W China Blue upgraded to Reci 75W tube
- Laser Power: 75
- Laser Bed Size: 500x300
- Home Position: TL
- Control Software: LIGHTBURN
- RDWorks Version: RDW v8.01.18
- Ruida Controller: Other
- Windows Version: Win 10
- Accessories: Ruida Controller R644XG
Rotary fixture
Eleven months of the year I’m an old fat guy but in December I’m a rock star, aka Santa
-
Jeffrey Aley
- Posts: 388
- Joined: Fri Aug 11, 2017
- Location: Folsom, California
- Country: United States
- Laser Machine Make or Type: Kehui
- Laser Power: 50W
- Laser Bed Size: 500mmx300mm
- Home Position: TL
- RDWorks Version: 8.01.24
- Ruida Controller: RDC6442
- Windows Version: Win10 Enterprise
- Accessories: Spray bottle with water (for small fires)
Fire extinguisher (for big fires)
Thanks very much for sharing your expertise with us!
What is your opinion of the gauge of wire used? I have been led to believe that it is properly-sized for 220V, but slightly undersized for 120V (because the current is higher). I am also fairly certain that the wiring for the "convenience plugs" is dramatically undersized and that the wiring cannot handle a 20A load (in total).
Because of other deficiencies in the design of my machine, I operate it with the lid ajar. This is because the machine does not provide sufficient make-up air for the extraction. Therefore, a safety switch for the lid would be unwelcome.
IIRC, my laser came with a faux CE logo
I believe it was on this forum that someone had an EMO switch fail. And it failed to be permanently "ON"! It would be convenient if you could recommend a supplier for a reliable, UL-listed EMO switch (Granger??).
Finally, I'll note that these machines are not at all consistent in the quality of their construction, wiring, or safety. Mine was wired neatly; photos of other machines indicates that they were not. So your experience with your machine may be totally different from someone else's.
-
Gene Uselman

- Posts: 2181
- Joined: Thu Jul 07, 2016
- Location: Suburban Minneapolis, Minnesota, US
- Country: USA
- Nickname: Gene
- Laser Machine Make or Type: QC
- Laser Power: 130W
- Laser Bed Size: 900x1300
- Home Position: TR
- Control Software: LIGHTBURN
- RDWorks Version: RDw .19 & Lightburn
- LightBurn Version: Latest
- Ruida Controller: RDC6442
- Windows Version: Win 10 Pro
- Accessories: I have a combining lenses, pin tables [homebuilt], honeycomb tables , wireless remote, Modifed Ultimate Air Assist, home built non-powered rotary device, PrusaMK4 and Mini Prusa printers.
Frank- thank you for posting this. I think it should be developed into a comprehensive article in the FAQ section and would do so it I felt qualified. I have lived with a wiring nightmare that I imported at the very end of 2015 and rewired pretty much complete- it is a 220v machine- and I have learned a lot from that.
I am now getting a new larger machine up to production and while I consider that a good quality machine, it has some things with the wiring that make me queezy. It is wired as a 120v machine but the core of the machine is 220v stepped up with a transformer. So it is 'single' phase 220v which differs from our two phase 220v... the rest of the world [mostly] uses this system apparently and we as usual are the odd ball. I have been developing a wiring schematic for both machines to make it possible for someone to service them in the possibility that I do not live forever as planned. I plan to publish the two schematics at some point and would appreciate it if you would look them over and make recommendations. We have a member in Ozland who I have worked with but they use the more normal 220v system downunder and he seems to be mired down in protecting his family from Covid [understandably].
Please consider taking on this project if you can spare the time- it would be a great service. I have searched for reliable info extensively. Gene
If the Help and advice you received here was of VALUE...
Please consider making a donation to maintain the RDWORKSLAB Forum.
The days that I keep my gratitude higher than
my expectations, Well, I have really good days.
Ray Wylie Hubbard- unfortunately deceased
Please consider making a donation to maintain the RDWORKSLAB Forum.
The days that I keep my gratitude higher than
my expectations, Well, I have really good days.
Ray Wylie Hubbard- unfortunately deceased
-
sebastien laforet

- Posts: 143
- Joined: Wed Sep 07, 2016
- Location: Lyon
- Country: France
- Laser Machine Make or Type: bodor BCL0605MU
- Laser Power: 100W
- Laser Bed Size: 60*50cm
- Home Position: TR
- RDWorks Version: 8.01.19
- Windows Version: 7
not sure about what you're talking, but in france (and probably most of europe), the 220V is "one phase" : there is 2 wires for power, 1 phase, and 1 neutral, and you have the earth/ground (which is not present in old plugs, but is now required everywhere in new installations)
you can also have 380V with 3 phases (so, 5 connectors in the plug : 3 phases, 1 neutral, 1 earth/grounding) , but it is reserved for large/industrial usage : heavy machinery, large ovens for restaurants, ...
you can also have 380V with 3 phases (so, 5 connectors in the plug : 3 phases, 1 neutral, 1 earth/grounding) , but it is reserved for large/industrial usage : heavy machinery, large ovens for restaurants, ...
Sébastien Laforet
machine : Bodor BCL-0605 (60x50) with 100W laser with TR origin.
Live in France
Primarily works laser for my wife (school teacher, so lots of boxes, letters, puzzles, ...) and miniature scenery (32mm scale : warmachine, infinity)
machine : Bodor BCL-0605 (60x50) with 100W laser with TR origin.
Live in France
Primarily works laser for my wife (school teacher, so lots of boxes, letters, puzzles, ...) and miniature scenery (32mm scale : warmachine, infinity)
-
Frank Small
- Posts: 73
- Joined: Sun Mar 24, 2019
- Location: Bennington, Vermont
- Country: USA
- Laser Machine Make or Type: 50W China Blue upgraded to Reci 75W tube
- Laser Power: 75
- Laser Bed Size: 500x300
- Home Position: TL
- Control Software: LIGHTBURN
- RDWorks Version: RDW v8.01.18
- Ruida Controller: Other
- Windows Version: Win 10
- Accessories: Ruida Controller R644XG
Rotary fixture
Jeffrey Aley wrote: Wed Dec 16, 2020 Thanks very much for sharing your expertise with us!
What is your opinion of the gauge of wire used? I have been led to believe that it is properly-sized for 220V, but slightly undersized for 120V (because the current is higher). I am also fairly certain that the wiring for the "convenience plugs" is dramatically undersized and that the wiring cannot handle a 20A load (in total).
The wire gauge used is ok for the loads involved as built, the wiring to the receptacles for air and water pumps is fine for the items provided but if you are upgrading maybe not. Someone had a chart on here for current capacity of different gauge wire but I’m not sure where I saw it. You are right the wiring and power cord will most likely not be sized for 20 AMPs. Frank
Because of other deficiencies in the design of my machine, I operate it with the lid ajar. This is because the machine does not provide sufficient make-up air for the extraction. Therefore, a safety switch for the lid would be unwelcome.
Maybe you could make a mounting block for the lid switch with 2 positions on it and move it to lid closed or lid ajar. Frank
IIRC, my laser came with a faux CE logo
What makes you say that, do you have a picture? In my current job I have spotted counterfeit UL stickers so I’m always curious to see other examples. Frank
I believe it was on this forum that someone had an EMO switch fail. And it failed to be permanently "ON"! It would be convenient if you could recommend a supplier for a reliable, UL-listed EMO switch (Granger??).
Try Automation Direct they have a wide selection of button and switches as well as most anything else you would need.
https://www.automationdirect.com/adc/sh ... lluminated
Frank
Finally, I'll note that these machines are not at all consistent in the quality of their construction, wiring, or safety. Mine was wired neatly; photos of other machines indicates that they were not. So your experience with your machine may be totally different from someone else's.
True, I did note that in my post. Frank
Eleven months of the year I’m an old fat guy but in December I’m a rock star, aka Santa
-
Frank Small
- Posts: 73
- Joined: Sun Mar 24, 2019
- Location: Bennington, Vermont
- Country: USA
- Laser Machine Make or Type: 50W China Blue upgraded to Reci 75W tube
- Laser Power: 75
- Laser Bed Size: 500x300
- Home Position: TL
- Control Software: LIGHTBURN
- RDWorks Version: RDW v8.01.18
- Ruida Controller: Other
- Windows Version: Win 10
- Accessories: Ruida Controller R644XG
Rotary fixture
Regarding two phase.... this is not anything we would normally run into in the US, Europe or Asia.
In the US and Canada (other places too) our normal electrical configuration is 120/240 volts nominal single phase. 120 volts is the measurement between the “hot” leg and neutral/ground. 240 volts is the measurement between two “hot” legs but this is not two phase. So if you were to measure the voltage between either “hot” leg and ground you would get 120 volts.
In Europe that is a different story, they do not normally have 120 volts available. Everything is 240 volts single phase. So like the US they have a grounded conductor (neutral) but when you measure between the “hot” leg and ground/neutral you get 240 volts.
So a piece of equipment made for the European market can be used in the US with a correctly wired plug and receptacle fairly easily.
A piece of equipment made to operate at 120 volts will not be that easy to use in the European market without stepping down the voltage with a transformer. It can be done but it’s more involved.
I’m going to say there are exceptions to all of this but what is stated above is the norm. I did not address three phase as that is a whole other animal. I hope this helps.
FYI 120 and 240 are nominal voltages but they can range from 110 and 220 as well.
Eleven months of the year I’m an old fat guy but in December I’m a rock star, aka Santa
-
Gene Uselman
- Posts: 2181
- Joined: Thu Jul 07, 2016
- Location: Suburban Minneapolis, Minnesota, US
- Country: USA
- Nickname: Gene
- Laser Machine Make or Type: QC
- Laser Power: 130W
- Laser Bed Size: 900x1300
- Home Position: TR
- Control Software: LIGHTBURN
- RDWorks Version: RDw .19 & Lightburn
- LightBurn Version: Latest
- Ruida Controller: RDC6442
- Windows Version: Win 10 Pro
- Accessories: I have a combining lenses, pin tables [homebuilt], honeycomb tables , wireless remote, Modifed Ultimate Air Assist, home built non-powered rotary device, PrusaMK4 and Mini Prusa printers.
I have an industrial building with 3 phase power and a 220v fuse box, and somehow I assumed that each leg of the 330V three phase being 110v, that using two legs would give you either 110V or 220v by using two out of phase legs. My dad used to say- Too soon old, too late smart- as I get older I can understand the wisdom of that.
I trained as an electrical tech 55 years ago, and have done more than my share of 110V and 220V wiring... and by good fortune I am still alive. The rest of the world [mostly] uses a 220v system that is different from our 220V and Brother Tim has patiently tried to explain that to me but I clearly still do not understand. Our new laser is wired to use our 110v power and then steps it up to 220V with a large transformer [that may not be the correct terminology but it looks like a 30 pound transformer to me] which actually powers the machine. After the transformer one of the wires goes to the E-switch which is used to turn the machine on and off- which does not seem 'correct' to me.
This is close to the power circuit- I am slowly building a schematic for the machine- I see I did not line up the two wires to the transformer very well- the filters provide power to the 24V 36V Power supplies and the High voltage power supplies for the tubes.
.
You do not have the required permissions to view the files attached to this post.
If the Help and advice you received here was of VALUE...
Please consider making a donation to maintain the RDWORKSLAB Forum.
The days that I keep my gratitude higher than
my expectations, Well, I have really good days.
Ray Wylie Hubbard- unfortunately deceased
Please consider making a donation to maintain the RDWORKSLAB Forum.
The days that I keep my gratitude higher than
my expectations, Well, I have really good days.
Ray Wylie Hubbard- unfortunately deceased
-
sebastien laforet
- Posts: 143
- Joined: Wed Sep 07, 2016
- Location: Lyon
- Country: France
- Laser Machine Make or Type: bodor BCL0605MU
- Laser Power: 100W
- Laser Bed Size: 60*50cm
- Home Position: TR
- RDWorks Version: 8.01.19
- Windows Version: 7
sure. the e-switch should be IN ADDITION to the normal switch. and the switch for main power and the e-switch shall be inline, so in any of them is off, the power for the whole machine is off.Gene Uselman wrote: Fri Dec 18, 2020 After the transformer one of the wires goes to the E-switch which is used to turn the machine on and off- which does not seem 'correct' to me.
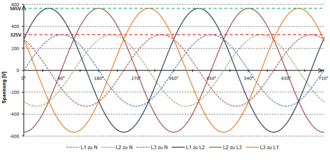
as about 110V "many" phases, this is alternative (sinusoidal) current, so wiring 2 phases together will not "add" the voltage. different phases should have a temporal offset so the resulting is more like that :
also, a common electrical motor for 1 phase current will absolutely NOT work for 3 phases. and 3 phases provides better output for motor (as there is no "dead" point in the current where the current is at 0), but in our machines, there is not need for raw power of motors, and there is a conversion AC --> DC in the main power supply so all motors are effectively using low voltage DC.
Sébastien Laforet
machine : Bodor BCL-0605 (60x50) with 100W laser with TR origin.
Live in France
Primarily works laser for my wife (school teacher, so lots of boxes, letters, puzzles, ...) and miniature scenery (32mm scale : warmachine, infinity)
machine : Bodor BCL-0605 (60x50) with 100W laser with TR origin.
Live in France
Primarily works laser for my wife (school teacher, so lots of boxes, letters, puzzles, ...) and miniature scenery (32mm scale : warmachine, infinity)
-
Frank Small
- Posts: 73
- Joined: Sun Mar 24, 2019
- Location: Bennington, Vermont
- Country: USA
- Laser Machine Make or Type: 50W China Blue upgraded to Reci 75W tube
- Laser Power: 75
- Laser Bed Size: 500x300
- Home Position: TL
- Control Software: LIGHTBURN
- RDWorks Version: RDW v8.01.18
- Ruida Controller: Other
- Windows Version: Win 10
- Accessories: Ruida Controller R644XG
Rotary fixture
Hello all-
Hope you all had a nice holiday season.
I'm sorry I have not followed up on this thread, I have had some family medical issues to deal with, but I will get back to this very soon! I ordered a bunch of control parts from Ali Express so they are a number of weeks out for delivery. Stay tuned! Frank
Hope you all had a nice holiday season.
I'm sorry I have not followed up on this thread, I have had some family medical issues to deal with, but I will get back to this very soon! I ordered a bunch of control parts from Ali Express so they are a number of weeks out for delivery. Stay tuned! Frank
Eleven months of the year I’m an old fat guy but in December I’m a rock star, aka Santa
-
Tim Mellor

- Posts: 560
- Joined: Wed May 29, 2019
- Location: Shipwreck Coast, Victoria
- Country: Australia
- Nickname: beanflying
- Laser Machine Make or Type: Vollerun WR3020
- Laser Power: 40W
- Laser Bed Size: 300x200
- Home Position: TR
- RDWorks Version: n/a
- Windows Version: 10
- Accessories: Modded and still Modding some more.
Hi Frank,
Good stuff
I have been an absent MOD and an EE. My late 2020 went astray with family/COVID issues but before I took a break I was working on some guides and hadn't got to breaking out a section on EStops in particular.
viewtopic.php?f=160&t=4823&p=26138#p26035 The online 3D model could always do with another set of eyes going over it so feel free to give some feedback here or on that thread.